Setting up QEMU: Difference between revisions
mNo edit summary |
Nisargshah95 (talk | contribs) m (add a workaround for qemu "usbdevice" option warning) |
||
| (13 intermediate revisions by 3 users not shown) | |||
| Line 5: | Line 5: | ||
If you already familiar with QEMU but have toubles with net, simply add following options to the qemu start command: | If you already familiar with QEMU but have toubles with net, simply add following options to the qemu start command: | ||
<code>-net nic,model= | <code>-net nic,model=rtl8139 -net user</code> | ||
It should work fine. So the whole run command looks like this: | It should work fine. So the whole run command looks like this: | ||
<code>qemu -L . -m 128 -fda /path/to/kolibri.img -boot a -hda /path/to/c100.img -hdb /path/to/c100_2.img -localtime -vga vmware -net nic,model= | <code>qemu-system-i386 -L . -m 128 -fda /path/to/kolibri.img -boot a -hda /path/to/c100.img -hdb /path/to/c100_2.img -localtime -vga vmware -net nic,model=rtl8139 -net user -soundhw ac97 -usb -usbdevice tablet</code> | ||
Where | Where | ||
| Line 28: | Line 28: | ||
-vga vmware | -vga vmware | ||
: Emulating vga card. <ref>QEMU man page http://qemu.weilnetz.de/qemu-doc.html#index-g_t_002dvga-60</ref> | : Emulating vga card. <ref>QEMU man page http://qemu.weilnetz.de/qemu-doc.html#index-g_t_002dvga-60</ref> | ||
-net nic,model= | -net nic,model=rtl8139 -net user | ||
: Net settings. <ref>QEMU man page http://qemu.weilnetz.de/qemu-doc.html#index-g_t_002dnet-70</ref> | : Net settings. ne2k_pci, RTL8139, i8255x, i8254x and Pcnet are all supported. <ref>QEMU man page http://qemu.weilnetz.de/qemu-doc.html#index-g_t_002dnet-70</ref> | ||
-soundhw ac97 | -soundhw ac97 | ||
: Emulating sound hardware. <ref>QEMU man page http://qemu.weilnetz.de/qemu-doc.html#index-g_t_002dsoundhw-26</ref> | : Emulating sound hardware. <ref>QEMU man page http://qemu.weilnetz.de/qemu-doc.html#index-g_t_002dsoundhw-26</ref> | ||
-usb -usbdevice tablet | |||
: The usb tablet HID device may be used to ease switching from one window to another on the host machine. (Mouse does not stay captured.) <ref>QEMU man page http://qemu.weilnetz.de/qemu-doc.html#usb_005fdevices</ref> | |||
'''USB device warning''' | |||
If you get a warning "''qemu-system-i386: -usbdevice tablet: '-usbdevice' is deprecated, please use '-device usb-...' instead''", use "-device usb-tablet" instead of "-usbdevice tablet" | |||
'''KVM issues''' | |||
If qemu complains about KVM errors (e.g. "Could not access KVM kernel module: No such file or directory"), try adding the -no-kvm flag to the command above. | |||
==Copying files to HDD images in Linux== | |||
Let's say you have a hi.txt file with "Hello world!" in it, and you'd like to make it available to KolibriOS easily. | |||
First, we'll need to create an empty HDD image named hda.img and format it: | |||
<code>touch hda.img | |||
dd if=/dev/zero of=hda.img count=<size in KB> bs=1k</code> | |||
Replace <size in KB> with the size of the image in KiloBytes, e.g. 102400 for a 100MB image. | |||
<code>mkfs.msdos hda.img</code> | |||
Now list files on the image: | |||
<code>mdir -i hda.img</code> | |||
You should see something like this: | |||
Volume in drive : has no label | |||
Volume Serial Number is FD16-6B35 | |||
Directory for ::/ | |||
No files | |||
104 634 368 bytes free | |||
Copying files is done via the mcopy command. Remember, the file we want to copy is hi.txt, replace it's name for different files: | |||
<code>mcopy -i hda.img hi.txt ::/</code> | |||
Listing files should reveal that we succeeded: | |||
<code>mdir -i hda.img</code> | |||
Example output: | |||
Volume in drive : has no label | |||
Volume Serial Number is FD16-6B35 | |||
Directory for ::/ | |||
hi txt 8 2014-03-15 21:04 hi.txt | |||
1 file 8 bytes | |||
104 632 320 bytes free | |||
Now we'll need to boot qemu using our new disk image, add this to the qemu command above: | |||
<code>-hdc /path/to/hda.img</code> | |||
Note: normally you should boot with option B set to OFF. If after boot you can not see the disk we added 1) open a bug report and 2) try booting with option B set to ON. | |||
Accessing the file inside KolibriOS: | |||
The new disk should be visible now, it is one of /hdX/* (if you booted with option B set to ON, it may be one of /bdX/*). Accessing it is easy, e.g. in KFM hd0/1 will already be open on the right panel. | |||
TROUBLESHOOTING: | |||
Sometimes, you may not be able to freely edit the .img virtual disk that you create and KolibriOS may show garbage values as files. Some developers prefer to use something like this : | |||
qemu-system-i386 -L . -m 128 -fda /path/to/kolibri.img -boot a -localtime -vga vmware -net nic,model=rtl8139 -net user -soundhw ac97 -usb -usbdevice disk:format=raw:fat:/some/directory -usbdevice tablet | |||
This will make KolibriOS mount /some/directory from your Linux machine to a USB drive on KolibriOS. You can access your files from KolibriOS using any file manager. | |||
==Using Qemu Manager== | ==Using Qemu Manager== | ||
| Line 39: | Line 116: | ||
We’re going to need these programs/files: | We’re going to need these programs/files: | ||
* Qemu Manager – download it from [http://www.davereyn.co.uk www.davereyn.co.uk] | * Qemu Manager – download it from [http://www.davereyn.co.uk www.davereyn.co.uk] or [http://qemu-manager.software.informer.com/download/ http://qemu-manager.software.informer.com/download/] | ||
* KolibriOS floppy disk image – [http://www.kolibrios.org www.kolibrios.org] | * KolibriOS floppy disk image – [http://www.kolibrios.org www.kolibrios.org] | ||
Latest revision as of 17:35, 29 May 2018
The purpose of this tutorial is to setup KolibriOS in QEMU (virtual machine emulator).
Using command line
If you already familiar with QEMU but have toubles with net, simply add following options to the qemu start command:
-net nic,model=rtl8139 -net user
It should work fine. So the whole run command looks like this:
qemu-system-i386 -L . -m 128 -fda /path/to/kolibri.img -boot a -hda /path/to/c100.img -hdb /path/to/c100_2.img -localtime -vga vmware -net nic,model=rtl8139 -net user -soundhw ac97 -usb -usbdevice tablet
Where
-L .
- BIOS, VGA BIOS and keymaps in current directory. [1]
-m 128
- Virtual RAM size to megs megabytes. [2]
-fda /path/to/kolibri.img
- Floppy disk image. [3]
-boot a
- Boot floppy first. [4]
-hda /path/to/c100.img -hdb /path/to/c100_2.img
- Hard disk image. [5]
-localtime
- Set virtual machine time to host machine time
-vga vmware
- Emulating vga card. [6]
-net nic,model=rtl8139 -net user
- Net settings. ne2k_pci, RTL8139, i8255x, i8254x and Pcnet are all supported. [7]
-soundhw ac97
- Emulating sound hardware. [8]
-usb -usbdevice tablet
- The usb tablet HID device may be used to ease switching from one window to another on the host machine. (Mouse does not stay captured.) [9]
USB device warning
If you get a warning "qemu-system-i386: -usbdevice tablet: '-usbdevice' is deprecated, please use '-device usb-...' instead", use "-device usb-tablet" instead of "-usbdevice tablet"
KVM issues
If qemu complains about KVM errors (e.g. "Could not access KVM kernel module: No such file or directory"), try adding the -no-kvm flag to the command above.
Copying files to HDD images in Linux
Let's say you have a hi.txt file with "Hello world!" in it, and you'd like to make it available to KolibriOS easily.
First, we'll need to create an empty HDD image named hda.img and format it:
touch hda.img
dd if=/dev/zero of=hda.img count=<size in KB> bs=1k
Replace <size in KB> with the size of the image in KiloBytes, e.g. 102400 for a 100MB image.
mkfs.msdos hda.img
Now list files on the image:
mdir -i hda.img
You should see something like this:
 Volume in drive : has no label
 Volume Serial Number is FD16-6B35
Directory for ::/

No files
                        104 634 368 bytes free
Copying files is done via the mcopy command. Remember, the file we want to copy is hi.txt, replace it's name for different files:
mcopy -i hda.img hi.txt ::/
Listing files should reveal that we succeeded:
mdir -i hda.img
Example output:
 Volume in drive : has no label
 Volume Serial Number is FD16-6B35
Directory for ::/

hi       txt         8 2014-03-15  21:04  hi.txt
        1 file                    8 bytes
                        104 632 320 bytes free
Now we'll need to boot qemu using our new disk image, add this to the qemu command above:
-hdc /path/to/hda.img
Note: normally you should boot with option B set to OFF. If after boot you can not see the disk we added 1) open a bug report and 2) try booting with option B set to ON.
Accessing the file inside KolibriOS:
The new disk should be visible now, it is one of /hdX/* (if you booted with option B set to ON, it may be one of /bdX/*). Accessing it is easy, e.g. in KFM hd0/1 will already be open on the right panel.
TROUBLESHOOTING:
Sometimes, you may not be able to freely edit the .img virtual disk that you create and KolibriOS may show garbage values as files. Some developers prefer to use something like this :
qemu-system-i386 -L . -m 128 -fda /path/to/kolibri.img -boot a -localtime -vga vmware -net nic,model=rtl8139 -net user -soundhw ac97 -usb -usbdevice disk:format=raw:fat:/some/directory -usbdevice tablet
This will make KolibriOS mount /some/directory from your Linux machine to a USB drive on KolibriOS. You can access your files from KolibriOS using any file manager.
Using Qemu Manager
Step by step tutorial follows! We’re going to need these programs/files:
- Qemu Manager – download it from www.davereyn.co.uk or http://qemu-manager.software.informer.com/download/
- KolibriOS floppy disk image – www.kolibrios.org
The first thing we’re going to do is to setup KolibriOS virtual machine on Qemu Manager, so it’s assumed that you have installed it already.
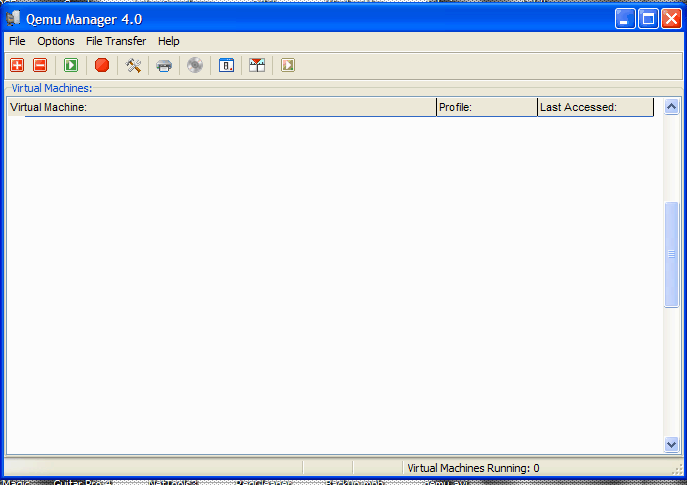
Launch Qemu Manager and you will see the following window.
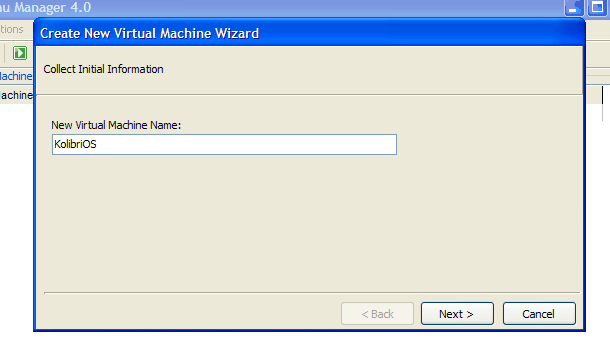
Click on the ![]() toolbar button to add a new machine. Then it will ask you to write the new virtual machine name:
toolbar button to add a new machine. Then it will ask you to write the new virtual machine name:
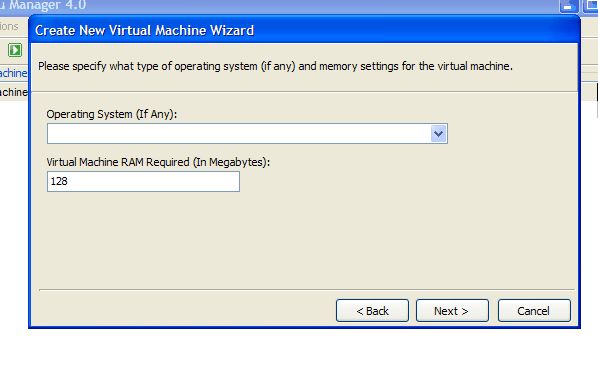
Then click Next and in that window fill the Virtual Machine RAM textbox with a RAM needed, remember that KolibriOS support 8MB of RAM as a minimum, I suggest using 64Mb
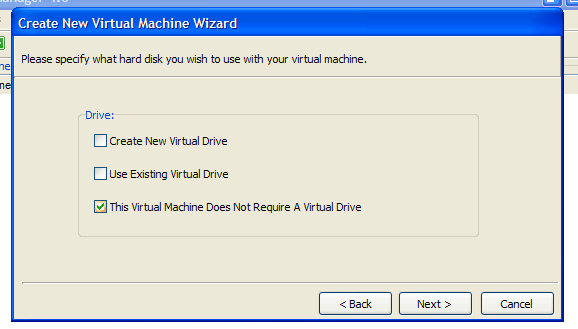
Click Next and in this window check “This Virtual Machine Does Not Require A Virtual Drive”
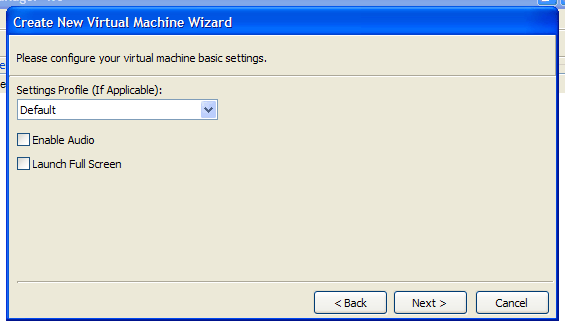
In the next window don’t modify anything:
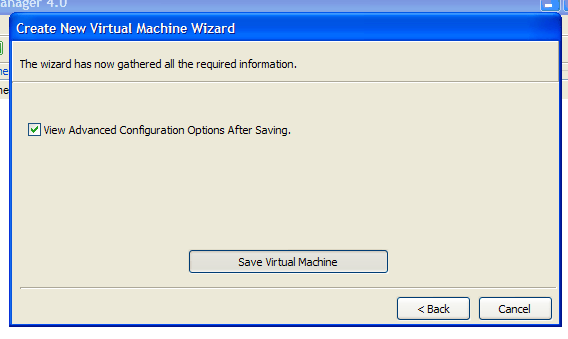
Click Next and in the following window click on “Save Virtual Machine” button
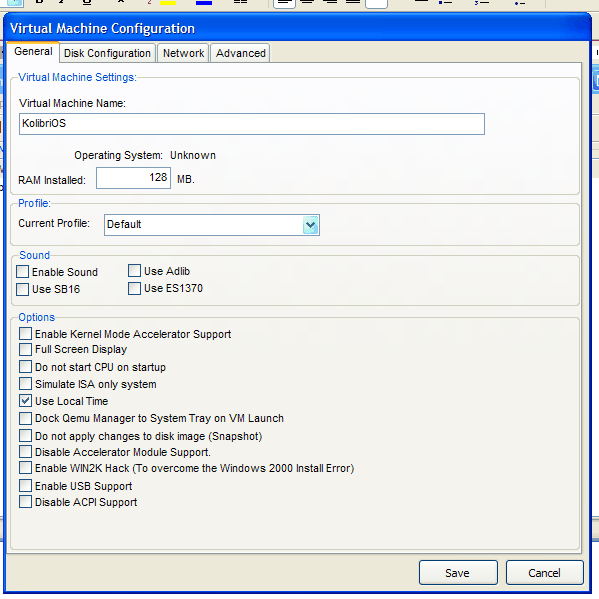
It will show you the following window:
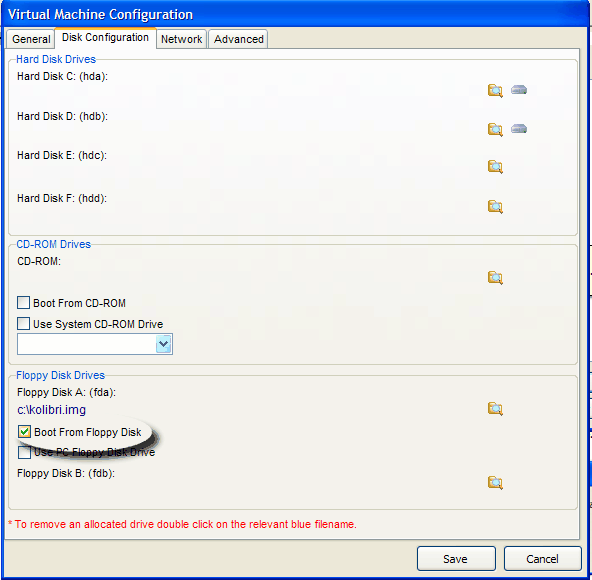
Select the “Disk Configuration” tab and click on the shown button, which is for choosing our KolibriOS floppy image:
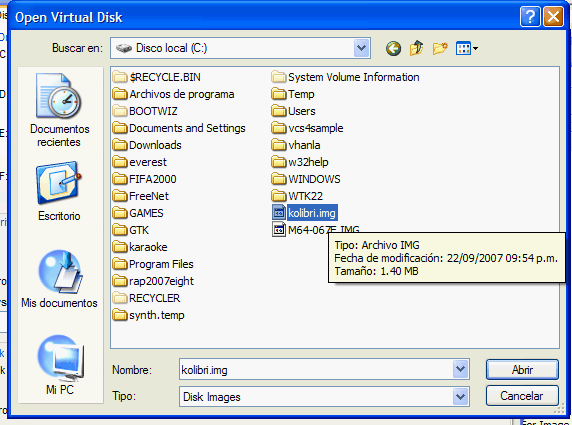
Then select the appropiate floppy image
It will warn you but just click YES to continue:
Next select “Boot from floppy disk”
Now just click Play, and let it fly!
References
- ↑ QEMU man page http://qemu.weilnetz.de/qemu-doc.html#index-g_t_002dL-93
- ↑ QEMU man page http://qemu.weilnetz.de/qemu-doc.html#index-g_t_002dm-21
- ↑ QEMU man page http://qemu.weilnetz.de/qemu-doc.html#index-g_t_002dfda-31
- ↑ QEMU man page http://qemu.weilnetz.de/qemu-doc.html#index-g_t_002dboot-20
- ↑ QEMU man page http://qemu.weilnetz.de/qemu-doc.html#index-g_t_002dhda-33
- ↑ QEMU man page http://qemu.weilnetz.de/qemu-doc.html#index-g_t_002dvga-60
- ↑ QEMU man page http://qemu.weilnetz.de/qemu-doc.html#index-g_t_002dnet-70
- ↑ QEMU man page http://qemu.weilnetz.de/qemu-doc.html#index-g_t_002dsoundhw-26
- ↑ QEMU man page http://qemu.weilnetz.de/qemu-doc.html#usb_005fdevices
