How to make changes and test application in KolibriOS
Environment: Windows machine + VMWare Workstation -> Ubuntu
Following this guidlines: [[1]]
1) Create CPUID application
CD to KolibriOS/Program/System/CPUID/trunk/
Run this command:
fasm CPUID.ASM CPUID
‘ls’ to check CPUID is created. Now we need to copy this to the disc.
2) Copy CPUID to disk, follow this steps:
sudo mkdir /media/floppy1/
sudo mount -o loop ~/kolibrios/kolibri.img /media/floppy1/
sudo mkdir /media/floppy1/my
sudo cp ~/kolibrios/programs/system/CPUID/trunk/CPUID /media/floppy1/my
sudo umount /media/floppy1/
This should copy the CPUID to disk, to check you can check ‘my’ folder before unmounting the disk.
3) Running a program in VirtualBox
Installing Oracle VM VirtualBox: sudo apt-get install virtualbox
Creating virtual machine: vboxmanage createvm --name "kolibrios" --register vboxmanage storagectl "kolibrios" --name "Floppy" --add floppy vboxmanage storageattach "kolibrios" --storagectl "Floppy" --port 0 --device 0 --type fdd --medium ~/kolibrios/kolibri.img
Running KolibriOS: vboxmanage startvm "kolibrios" &
4) Open your modified CPUID application in KolibriOS Once inside kolibri, open KFAR.
In the right hand side, open up your disc image. Should look like this.
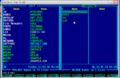
See CPUID application

Run CPUID application. (Just double click this ). Should see your updated CPUID application.